


Today, we’ll cover a cool Terraspace feature. It allows you to deploy all of your infrastructure in a single command.
terraspace all up
Terraspace calculates the dependencies and deploys your code in the right order.
Terraform Recommendations
First, let’s talk about some Terraform recommendations. They recommend separating your code on a per configuration and environment basis. Here are examples straight from the docs.
- billing-app-dev
- billing-app-prod
- networking-dev
- networking-prod
Here’s a table to help explain these “scoped configurations” in different contexts:
| Product | Scope |
|---|---|
| Terraform Cloud | A workspace |
| Terraform OSS | A terraform module with a separate statefile |
| Terraspace | A stack |
Believe the reasons for the strategy are because:
- It avoids a monolithic structure and statefile that can take forever to run. See: Terraform takes a very long time to run. It’s not fun to wait 20+ minutes for your
terraform apply. - It’s safer to update. Since the changes are more limited in scope, the blast radius is reduced.
- It helps decouple the code to logically reusable units.
You deploy these “scoped configurations” separately.
The Problem
One of the main issues with separating your code into separate stacks is that you have to deploy them independently. For example, you must manually deploy the VPC and then the instance afterward. You lose a significant advantage of what Terraform does: orchestration.
Enter Terraspace All
The terraspace all commands solves this problem by calculating the dependency graph and deploying the stacks in the correct order for you. Terraspace also parallelizes the batches. Here’s a dependency graph example.
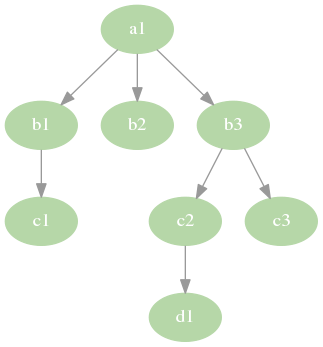
Let’s deploy:
$ terraspace all up
Will run:
   terraspace up b2 # batch 1
   terraspace up c1 # batch 1
   terraspace up c3 # batch 1
   terraspace up d1 # batch 1
   terraspace up b1 # batch 2
   terraspace up c2 # batch 2
   terraspace up b3 # batch 3
   terraspace up a1 # batch 4
Are you sure? (y/N)
Once you confirm, Terraspace deploys the batches in parallel. Essentially, Terraspace handles the orchestration.
Are you sure? (y/N) y
Batch Run 1:
Running: terraspace up b2 Logs: log/up/b2.log
Running: terraspace up c1 Logs: log/up/c1.log
Running: terraspace up c3 Logs: log/up/c3.log
Running: terraspace up d1 Logs: log/up/d1.log
terraspace up b2:  Apply complete! Resources: 1 added, 0 changed, 0 destroyed.
terraspace up c1:  Apply complete! Resources: 1 added, 0 changed, 0 destroyed.
terraspace up c3:  Apply complete! Resources: 1 added, 0 changed, 0 destroyed.
terraspace up d1:  Apply complete! Resources: 1 added, 0 changed, 0 destroyed.
Batch Run 2:
Running: terraspace up b1 Logs: log/up/b1.log
Running: terraspace up c2 Logs: log/up/c2.log
terraspace up b1:  Apply complete! Resources: 1 added, 0 changed, 0 destroyed.
terraspace up c2:  Apply complete! Resources: 1 added, 0 changed, 0 destroyed.
Batch Run 3:
Running: terraspace up b3 Logs: log/up/b3.log
terraspace up b3:  Apply complete! Resources: 1 added, 0 changed, 0 destroyed.
Batch Run 4:
Running: terraspace up a1 Logs: log/up/a1.log
terraspace up a1:  Apply complete! Resources: 2 added, 0 changed, 0 destroyed.
Time took: 41s
$
Terraspace provides a reduced-noise summary of the runs. The full logs are also written for further inspection and debugging. The terraspace logs command is useful for viewing the logs.
How to Configure Dependencies
To configure dependencies, you merely wire stack outputs to inputs variables of another stack. Here is an example of an instance stack that depends on a vpc stack.
app/stacks/vpc/outputs.tf
output "vpc_id" {
  description = "VPC ID"
  value       = aws_vpc.this.id
}
app/stacks/instance/variables.tf
variable "vpc_id" {
  description = "VPC to launch instance in"
  type        = string
  default     = null
}
Wire them together with the output helper in the instance tfvars file.
app/stacks/instance/tfvars/base.tfvars
vpc_id = <%= output('vpc.vpc_id') %>
Terraspace infers the dependency from this connection. It’s that simple.
Learn more: Deploy Multiple Stacks.
Visualizing with Graphs
You can create a visual dependency graph diagram with:
terraspace all graph
The earlier example dependency graph was generated with this command. Here’s the graph again:
Targeting Subgraphs and Subtrees
You can also target subgraphs by specifying stack names. Example:
terraspace all graph b1 b3
Produces:
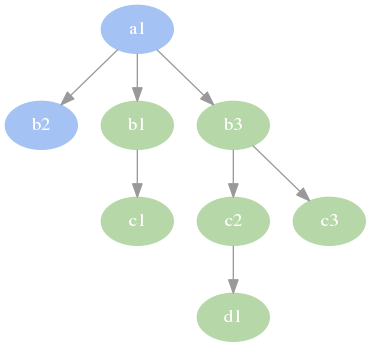
You can filter for stacks with any of all commands. Here’s an example with up:
$ terraspace all up b1 b3
Will run:
   terraspace up c1 # batch 1
   terraspace up c3 # batch 1
   terraspace up d1 # batch 1
   terraspace up b1 # batch 2
   terraspace up c2 # batch 2
   terraspace up b3 # batch 3
Are you sure? (y/N)
This targets the b1 and b3 stacks and their dependencies.
Tearing it All Down
Finally, to tear down all the infrastructure.
$ terraspace all down
Will run:
   terraspace down a1 # batch 1
   terraspace down b3 # batch 2
   terraspace down b1 # batch 3
   terraspace down c2 # batch 3
   terraspace down b2 # batch 4
   terraspace down c1 # batch 4
   terraspace down c3 # batch 4
   terraspace down d1 # batch 4
Are you sure? (y/N)
Once you’re ready, type y and enter.
Are you sure? (y/N) y
Batch Run 1:
Running: terraspace down a1 Logs: log/down/a1.log
terraspace down a1:  Changes to Outputs:
terraspace down a1:  Destroy complete! Resources: 2 destroyed.
Batch Run 2:
Running: terraspace down b3 Logs: log/down/b3.log
terraspace down b3:  Changes to Outputs:
terraspace down b3:  Destroy complete! Resources: 1 destroyed.
Batch Run 3:
Running: terraspace down b1 Logs: log/down/b1.log
Running: terraspace down c2 Logs: log/down/c2.log
terraspace down b1:  Changes to Outputs:
terraspace down b1:  Destroy complete! Resources: 1 destroyed.
terraspace down c2:  Changes to Outputs:
terraspace down c2:  Destroy complete! Resources: 1 destroyed.
Batch Run 4:
Running: terraspace down b2 Logs: log/down/b2.log
Running: terraspace down c3 Logs: log/down/c3.log
Running: terraspace down d1 Logs: log/down/d1.log
Running: terraspace down c1 Logs: log/down/c1.log
terraspace down b2:  Changes to Outputs:
terraspace down b2:  Destroy complete! Resources: 1 destroyed.
terraspace down c1:  Changes to Outputs:
terraspace down c1:  Destroy complete! Resources: 1 destroyed.
terraspace down c3:  Changes to Outputs:
terraspace down c3:  Destroy complete! Resources: 1 destroyed.
terraspace down d1:  Changes to Outputs:
terraspace down d1:  Destroy complete! Resources: 1 destroyed.
Time took: 48s
$
The infrastructure is destroyed in reverse order.
More Commands
There are more all commands: plan, up, down, show, output, graph, refresh, providers, etc. We’ve covered the essential ones to get started in this post. Learn more:
- Deploy All: Intro docs.
- Deploy Multiple: Covers tfvars and some other options more closely.
- Terraspace All: CLI Reference Docs.
- Terraform Graph Demo: Example GitHub Repo to demonstrate deploying multiple stacks and their dependencies.
The Best of Both Worlds
Terraspace helps you solve the issue of having to deploy individual stacks manually. Instead of having to run terraspace up individually, it allows you to deploy all stacks with a single command:
terraspace all up
Additionally, you can target subgraphs to deploy:
terraspace all up b1 b3
Lastly, you can always drop down and run the individual stack to debug. Example:
terraspace up c1
terraspace up b1
Terraspace gives you the best of both worlds. To learn more about Terraspace check out terraspace.cloud.